One-Hot Encoding in Practice

mtimFxhData is the king in machine learning. In the process of building machine learning models, data is used as the input features.

Input features comes in all shapes and sizes. For building a predictive model with a better accuracy rate, we should understand the data as well as the logic behind the algorithm we going to use to fit the model.

Data Understanding; as the second step of CRISP-DM, guides for understanding the types and the way the data we get has been represented. We can distinguish three main kinds of data feature.

  1. Quantitative Data           – Data with numerical scale (Age of a person in years, Price of a house in dollars etc.)
  2. Ordinal features              – Data without a scale but with ordering (Ordered sets/ first, second, third etc.)
  3. Categorical features       – Data without a numerical scale neither an ordering. These features don’t allow any statistical summary. (Car manufacturer categories, Civil status, N-grams in NLP etc.)

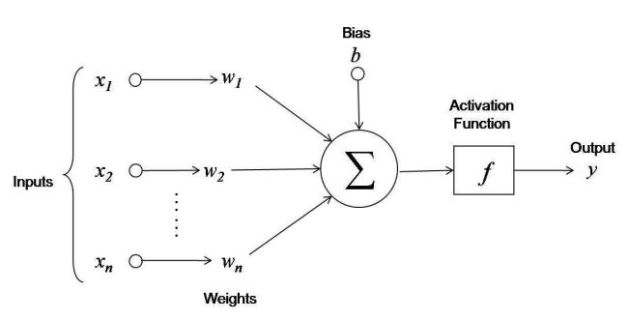
Most of the machine learning algorithms such as linear regression, logistic regression, neural network, support vector machine works better with numerical features.

Quantitative features come with a numerical value and they can be directly used (Sometimes data preprocessing, normalization may have to use) as the input features of ML algorithms.

Ordinal features can be easily represented in numbers (Ex. First = 1, Second = 2, Third = 3 …). This is called Integer Encoding. Representing ordinal features using numbers makes sense because the dependency between each representation can be notated in a numerical way.

There are some algorithms that can directly deal with joint discrete distribution such as Markov chain / Naive Bayes / Bayesian network, tree based, etc. These algorithms can work with categorical data without any encoding; while we should encode the categorical features in a way to represent in a numerically to use as the input features for other ML algorithms. That means it’s better to change the categorical features to numerical most of the times 😊

There are some special cases too. For an example, while naïve bias classification only really handles categorical features, many geometric models go in the other direction by only handling quantitative features.

How to convert Categorical data for Numerical data?

There are few ways to covert the categorical data to numerical data.

  • Dummy encoding
  • One-hot encoding / one-of-K scheme

are the most prominent ways of it.

One hot encoding is the process of converting the categorical features into numerical by performing “binarization” of the category and include it as a feature to train the model.

In mathematics, we can define one-hot encoding as…

One hot encoding transforms:

a single variable with n observations and d distinct values,

to

d binary variables with n observations each. Each observation indicating the presence (1) or absence (0) of the dth binary variable.

Let’s get this clear with an example. Suppose you have ‘flower’ feature which can take values ‘daffodil’, ‘lily’, and ‘rose’. One hot encoding converts ‘flower’ feature to three features, ‘is_daffodil’, ‘is_lily’, and ‘is_rose’ which all are binary.

CaptureA common application of OHE is in Natural Language Processing (NLP). It can be used to turn words to vectors so easily. Here comes a con of OHE, where the vector size might get very large with respect to the number of distinct values in the feature column.If there’s only two distinct categories in the feature, no need to construct to additional columns. You can just replace the feature column with one Boolean column.

oJEie

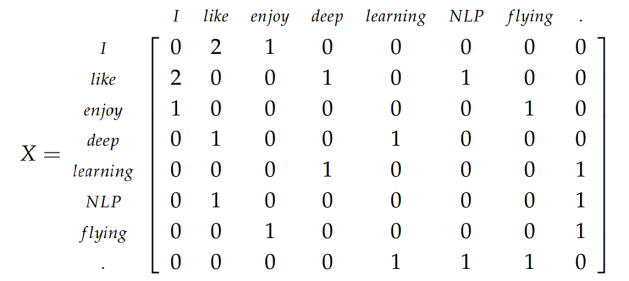
OHE in word vector representation

You can easily perform One-hot encoding in AzureML Studio by using the ‘Convert to Indicator Values’ module. The purpose of this module is to convert columns that contain categorical values into a series of binary indicator columns that can more easily be used as features in a machine learning model, which is the same happens in OHE. Let’s look at performing One-Hot encoding using python in next article.

Mission Plan for building a Predictive model

maxresdefault
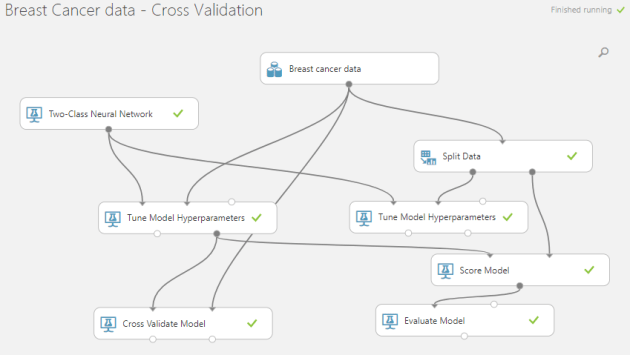
When it comes to a machine learning or data science related problem, the most difficult part would be finding out the best approach to cope up with the task. Simply to get the idea of where to start!

Cross-industry standard process for data mining, commonly known by its acronym CRISP-DM, is a data mining process model describes commonly used approaches that data mining experts use to tackle problems. This process can be easily adopted for developing machine learning based predictive models as well.

CRISP-DM_Process_Diagram

CRISP – DM

No matter what are the tools/IDEs/languages you use for the process. You can adopt your tools according to the requirement you’ve.

Let’s walk through each step of the CRISP-DM model to see how it can be adopted for building machine learning models.

Business Understanding –

This is the step you may need the technical knowhow as well as a little bit of knowledge about the problem domain. You should have a clear idea on what you going to build and what would be the functional value of the prediction you suppose to do through the model. You can use Decision Model & Notation (https://en.wikipedia.org/wiki/Decision_Model_and_Notation) to describe the business need of the predictive model. Sometimes, the business need you are having might be able to solve using simple statistics other than going for a machine learning model.

Identifying the data sources is a task you should do in this step. Should check whether the data sources are reliable, legal and ethical to use in your application.

Data Understanding –

I would suggest you to do the following steps to get to know your data better.

  1. Data Definition – A detailed description on each data field in the data source. The notations of the data points, the units that the data points have been measured would be the cases you should consider about.
  2. Data Visualization – Hundreds or thousands of numerical data points may not give a clear idea for you what the data is about or an idea about the shape of your data. You may able to find interesting subsets of your data after visualizing it. It’s really easy to see the clustering patterns or the trending nature of the data in a visualized plot.
  3. Statistical analysis – Starting from the simple statistical calculations such as mean, median; you can calculate the correlation between each data field and it will help you to get a good idea about the data distribution. Feature engineering to increase the accuracy of the machine learning model. For performing that a descriptive statistical analysis would be a great asset.

For data understanding, The Interactive Data Exploration, Analysis and Reporting tool (IDEAR) can be used without getting the hassle of doing all the coding from the beginning. (Will discuss on IDEAR in a long run soon)

Data Preparation –

Data preparation would take roughly 80% of your time of the process implying it’s the most vital part in building predictive models.

This is the phase where you convert the raw data that you got from the data sources for the final datasets that you use for building the ML models. Most of the data you got from raw sources like IoT sensors or collectives are filled with outliers, contains missing values and disruptions. In the phase of data preparation, you should follow data preprocessing tasks to make those data fields usable in modeling.

Modeling –

Modeling is the part where algorithms comes to the scene. You can train and fit your data to a particular predictive model to perform the deserved prediction. You may need to check the math behind the algorithms sometimes to select the best algorithm that won’t overfit or underfit the model.

Different modeling methods may need data in different forms. So, you may need to revert back for the data preparation phase.

Evaluation –

Evaluation is a must before deploying a model. The objective of evaluating the model is to see whether the predictive model is meeting the business objectives that we’ve figured out in the beginning. The evaluation can be done with many parameter measures such as accuracy, AUC etc.

Evaluation may lead you to adjust the parameters of the model and might have to choose another algorithm that performs better. Don’t expect the machine learning model to be 100% accurate. If it is 100% most probably it would be an over fitted case.

Deployment –

Deployment of the machine learning model is the phase where the client, or the end user going to consume. In most of the cases, the predictive model would be a part of an intelligent application that acts as a service that gets a set of information and give a prediction as an output of that.

I would suggest you to deploy the module as a single component, so that it’s easy to scale as well as to maintain. APIs / Docker environments are some cool technologies that you can adopt for deploying machine learning models.

CRISP-DM won’t do all the magic of getting a perfect model as the output though it would definitely help you not to end up in a dead-end.

Tips & Tricks for building a better LUIS model – 2

Capture
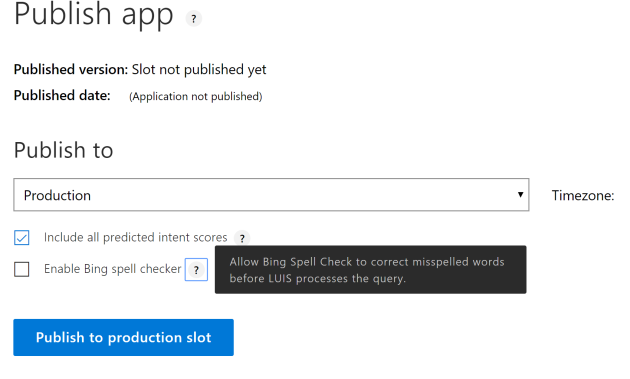
2017 ended up making ‘chatbots’ not a trend but an essential in the tech world. With the rise of chatbots, building up effective natural language understanding (NLU) models is a must. LUIS is an admirable service from Microsoft Cognitive Services that can use for building NLU models.

Most of the cases LUIS models perform well but in some cases LUIS models pop out with unexpected results. This may cause with various reasons including the less understanding on the business domain of the chatbot.

Here I’m adding few more for the points we discussed in the previous article, that we need to consider when building accurate LUIS models.

Note that LUIS has got a major update as well as a UI change compared to the version we used back last year.

Using Phrase List

You can create a phrase list for teaching synonyms for the model. For an example here, I’ve added a phrase list for the word “good”. The wizard recommends a set of words that can added to the phrase list and you can select the appropriate words from those suggestions. No need of typing all the synonyms. Let LUIS handle it. 😊

3_phrase list
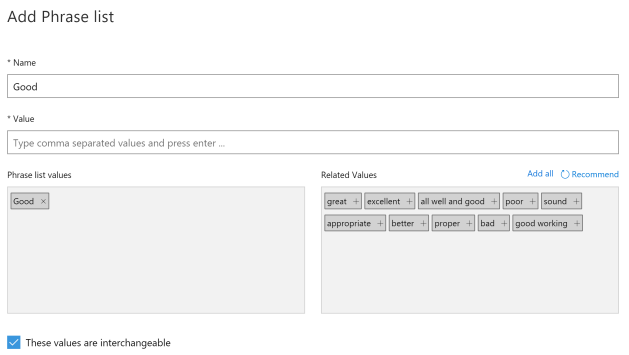
Another use of the Phrase list is to train the model the domain specific words. As an example, you can add a list of fruit names (Apple, Orange, Grapes) to a phrase list and give it a name. It’ll help the LUIS model to align according to the given domain.

Use same amount of utterances to train each intent

When you training the intents using possible utterances, make sure to use roughly the same number of utterances for each intent. Else the intent predicting process might be bias to intents with higher number of utterances.

Comparing the accuracy of the model with published versions

With the new LUIS portal, you can test the accuracy of the built model without connecting it to a bot service. Adding to that you can compare the difference of two versions of the same LUIS model at the same time. After observing the difference for various utterances, you can decide which model version should go for production.

5_test

LUIS Programmatic API

This is not directly attached with optimizing the accuracy. LUIS Programmatic API allows you to do all most all the tasks that you perform to build and train a LUIS model through API calls. This may comes handy when you building a bot that can learn by itself.

Add Bing spell checker to the chatbot

You may notice that the spelling mistakes of the user cause wrong intent identifications. To overcome this issue, you can enable bing spell checker in your LUIS model. This may cost you a bit, but the accuracy of identifying intents would go up.

1_spellcheck

If you have more tips & tricks to share for optimizing NLU models, do share here as comments. 😊

Deploy Machine Learning Models in a Production environment as APIs (Python Flask + Visual Studio)

Intelligent application building basically consist of integrating machine learning based predictive components for the apps and systems. Mostly data scientists or the AI engineers are accountable of building these machine learning models.

When it comes to integration and deployment in production environment, the problem occurs with platform dependency. Most of the data scientists and AI engineers are pretty comfortable with python or R and they develop their models with them, though the rest of the system would be on .NET or Java based application.

One of the best approaches to connect these components together is deploying the ML predictive module as a web API and calling the API through the application. When it comes to APIs any programmer can work with it when they have the API definition.

Flask is a small and powerful web framework for Python. It’s easy to learn and simple to use, enabling you to build your web app in a short amount of time. Visual Studio provides an easy way to create Python flask web applications through it’s templates. Here’s the steps I’ve gone through for deploying the ML experiment as a REST API.

01. Create the machine learning model, train, tune and evaluate it.

Here what I’ve done is a simple linear regression for predicting the monthly salary according to the years of experience. Sci-kit learn python library has been used for performing the regression operation. The dataset used for the experiment is from SuperDataScience. 

The code is available in the GitHub repository .

02. Creating the pickle

When you deploy the predictive model in production environment, no need of training the model with code again and again. Python has a built-in method of persisting data called pickle. The pickle module can serialize objects or data into a file that we can save and load from. You can just use the pickle as a binary reference generating the output.  scikit-learn has their own model persistence method we will use: joblib. This is more efficient to use with scikit-learn models due to it being better at handling larger numpy arrays that may be stored in the models.

03. Create a Python Flask web application.

Simply go for Visual Studio. (I’m using VS2017 which comes with python by default) Select web project. The step by step guide is here.  I would recommend you to go with option 2 mentioned in the blog because it reduces lot of unnecessary overhead.

f_2
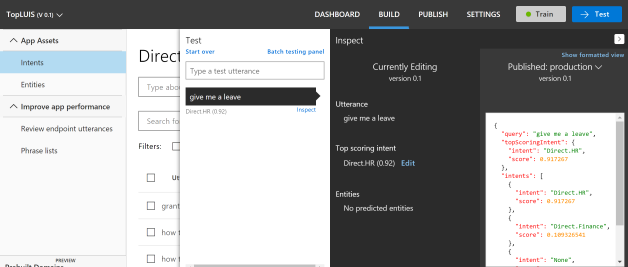
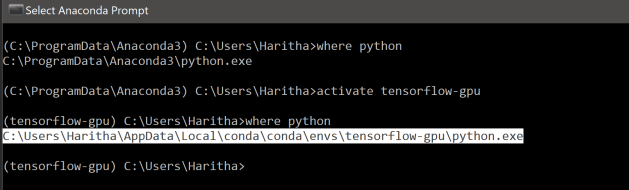
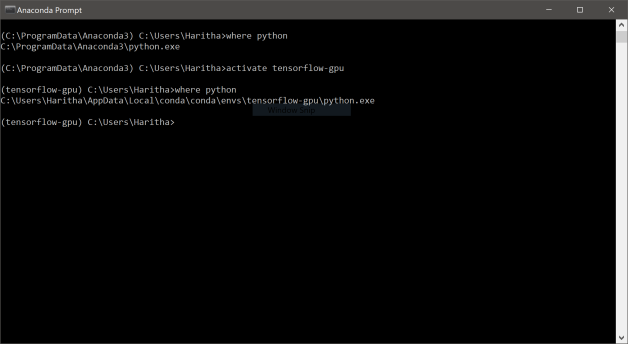
For the safe side, use python virtual environments. It would avoid many hassles occurs with library dependencies. I’ve used anaconda environment as the base of virtual environment.

f_3

04. Create the API.

Create a new python file in your project and set it as the startup file. (In my case MLService.py is the startup file which contains the API code). The pickle file that contains the model binaries is the only dependency the API is getting when it is deployed.

f_7
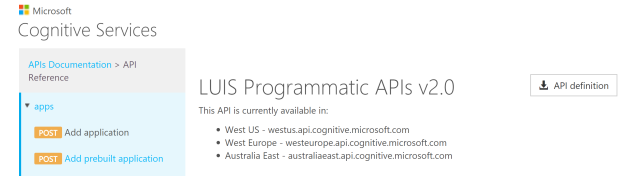
Here the API operates through POST methods which accepts the input in JSON.

04. Run & Test

You can run the API and test by sending POST requests to the URL with a JSON body. Here I’ve used postman to send a POST request and it gives me the predicted salary for the entered number of months.

f_5

You can access the whole code of the project through my GitHub repo here.

f_6

    Do comment if you have any suggestion to change the API structure.

Handling Big snakes on Visual Studio

In the last post we discuss on setting up a Windows rig for deep learning. If you still haven’t setup your machine, go do it first: D

After getting the so called big snakes; python and anaconda in the machine, we should have a proper IDE for coding.

There are many good IDEs you can use in Windows environment to code in python. Pycharm, Spyder are some popular tools.

If you familiar with Visual Studio, the so-called father of all IDEs, python works smoothly with VS. There are few configurations need to be done.

c1
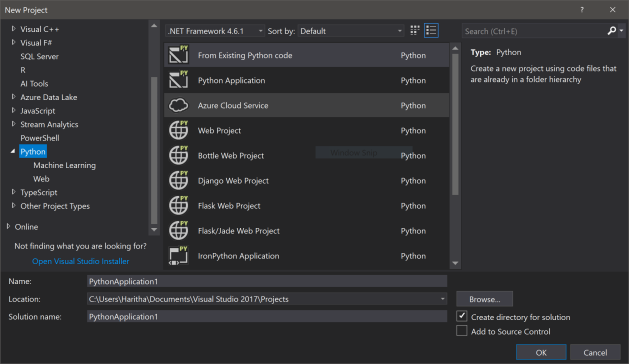
No need to purchase Visual Studio enterprise or ultimate. The freely available Visual Studio Community edition works fine. In 2017 version python comes along side with the default installation options. For the later versions you need to install Python Tools for Visual Studio (PTVS) separately.

https://docs.microsoft.com/en-us/visualstudio/python/python-in-visual-studio

Refer this guide for more details.

The python environments configured to machines can be seen from ‘Python Environments’ pane of Visual Studio. (If it is not there go for Tools -> Python -> Python Environments)

c2

By default, your Anaconda environment and default python environment should be there. First Refresh those environments to support intelliSense and grab the installed libraries for the DB.

For our deep learning experimentations, we configured a separate python environment before. To add that environment for visual studio follow the following steps.

01. Click Custom on ‘Python environments’

02. Go for anaconda environments and activate your pre-configured environment for deep learning (Mine is tensorflow-gpu)

c4

03. Copy the interpreter path of the environment

04. Insert it for the interpreter path and click “auto detect’. Visual Studio will detect the rest

c3

05. Click Apply

It may take few minutes to refresh the packages as well as the intelliSense. Make the configured environment your default and open the interactive. You are good to go 😊

Configuring a Windows Running Deep Learning Rig

When it comes to deep learning; the first thing comes to your mind is the “Computation Power”. The thousands of matrix operations that you going to perform when training the deep neural networks would take ages if you going to use only the CPU to do it.

The solution is the Graphical Processing Units (GPUs). introduction-to-multi-gpu-deep-learning-with-digits-2-mike-wang-22-638

There are few ways that you can get the power of high computation power for deep learning.

No offence, in my experience Linux operating system (What I’m using is the Ubuntu flavor) comes handy with performing deep learning operations in python because the terminal, bash commands, open source editing tools, GPU hackability is bit easy for me in Linux.

But the recent windows and Visual Studio updates too make it possible to do deep learning on your Windows rig.

Here are the steps I’ve followed to configure my laptop to perform some DL based computations with Tensorflow and Keras.

The laptop I’m using is an Asus UX310UA with Core i7 7th Gen processor, 16GB RAM and Nvidia Geforce 940MX 2 GB GPU.c2

I’m running Windows 10 Enterprise 1703 build on my laptop.

Please note that the following steps may change according to some conditions.

  1. Check the GPU processing capability of your GPU

If you wish to use your GPU for do parallel processing, first check the CUDA supportability of your GPU device. More the CUDA cores you have, more the computation you get. As an example, Nvidia Tesla K80 is having 4992 CUDA cores while Geforce 940MX equipped with 384 CUDA cores. The GPU compute capability should be 3.0 or higher.

Check whether your GPU is listed in the list.

https://www.geforce.com/hardware/technology/cuda


  1. Install CUDA Toolkit

Installing CUDA on Windows has a dependency for a C++ compiler. The CUDA version I’ve installed in my laptop is CUDA 8.0. Along with that I’ve installed Visual C++ 15.0 compiler. Refer the following guide to install CUDA Toolkit for your computer.

 http://docs.nvidia.com/cuda/cuda-installation-guide-microsoft-windows/index.html


  1. Install CuDNN Tools

For faster computations, you need to install CUDA Deep Neural Network toolkit. Depends on the CUDA version that you’ve installed you should select the appropriate CuDNN version. In my case with CUDA 8.0 Both CuDNN 7.0 & CuDNN 6.0 works. When it comes to package installations, CuDNN 7.0 throwed me some errors. So, I went with CuDNN 6.0 and it’s working fine on my machine 😊

Note that you need to do some manual file copy pastings in this step.

http://docs.nvidia.com/deeplearning/sdk/cudnn-install/index.html#install-windows

For safe side, restart the machine now! It’ll then pop up any additional dependencies that the GPU ask you to install.


  1. Install Anaconda

Now it’s time for the Big Snake! Anaconda is the leading Python data science platform. This framework comes with many pre-installed essential libraries and configurations that you may need regularly. Go with Python3 since it is the latest.

https://www.anaconda.com/download/


  1. Create a python environment for your experiments

Python comes with hell a lot of libraries that you may need to compile your program. So best thing is to create a separate environment for deep learning and use it. It’ll secure you from tangling the dependencies among libraries.

Go for Anaconda prompt (Find it on start menu – Advised to open the conda prompt as administrator) and push the command. We are using python 3.5 at the moment. ‘tensorflow-gpu’ is the environment name.

conda create -n tensorflow-gpu python=3.5 anaconda

Activate the environment

activate thensorflow-gpu

c1

  1. Install Theano

Theano is a Python library that allows you to define, optimize, and evaluate mathematical expressions involving multi-dimensional arrays efficiently. We need it! Make sure you are installing all of these inside your environment.

conda install theano


  1. Install mingw python

Even though python is an interpreted language, you may ned to install Windows C++ compilers in some cases. For python 3.5/3.6 you can use Visual C++ 14.0 compiler.

conda install mingw libpython


  1. Install tensorflow

Tensorflow is an open source library for numerical computation. You can install the cpu version if you don’t have a GPU in your machine just by installing the CPU version.

pip install tensorflow-gpu


  1. Install keras

Keras is a high-level neural network API. It can sun on top of TensorFlow, CNTK or Theano. For coding easiness will install Keras too.

conda install keras


  1. Update all the packages

conda update –all

All set! 😊 now you are ready to start coding. Start with your favorite IDE. For me, I prefer Spyder and sometimes Visual Studio. You can directly go for spyder from your Anaconda prompt or Anaconda navigator.  c3

Will discuss on dealing with python on Visual Studio in the next article.

Artificial Neural Networks with Net# in Azure ML Studio

The ideas for neural networks go back to the 1940s. The essential concept is that a network of artificial neurons built out of interconnected threshold switches can learn to recognize patterns in the same way that an animal brain and nervous system does.

Though the name “neural network” gives an idea of a ‘black box’ type predictive operation; ANN is a set of mathematical operations.

VqOpE

As the name implies by itself; neural network is a structural ‘network’. The nodes of the neural network are organized in layers and the nodes are connected with each other with edges. The edges are directional and they are weighted.

Azure Machine Learning Studio comes with pre-built neural network modules that can easily use for predictive analytics.

NN models

Pre-built neural networks in AML Studio  

Multiclass Neural Network Module –

Used for multiclass classification problems. The number of hidden nodes, the learning date, number of learning iterations and many parameters can be changed easily by changing the module properties.

Two-Class Neural Network –

Ideal for binary classification problems. Same as the Multiclass neural network module, the properties of the neural network can be changed by the module properties.

Neural Network regression –

This is a supervised machine learning method that can be used to predict a numerical value.

These simple pre-built modules can be added to your ML experiment with just a drag and drop and change the parameters by changing the module properties. What you going to do if you want to implement a complex neural network architecture? Or to create a deep neural network with more hidden layers?

AzureML Studio comes handy here with providing you the ability to define the hidden layer/layers of the ANN with a script. Net# scripting language provide the ability to define almost any neural network architecture in an easy to read format.

Net# scripting language is able to

  • Create hidden layers and control the number of nodes in each layer.
  • Specify how layers are to be connected to each other.
  • Define special connectivity structures, such as convolutions and weight sharing bundles.
  • Specify different activation functions.

In Azure Machine Learning, you can add the Net# scripts by choosing ‘Custom definition script’ in Hidden layer specification property. By default, it would set to the fully connected case.

properties

Net# lexical is more similar to C#. The structure of a Net# script has four main sections.

  1. Constant declaration (Optional) – Define values used elsewhere in the neural network definition
  2. Layer declaration – The input, hidden and output layers are defined with the layer dimensions. The layer declaration for hidden or output layer can include the output function.
  3. Connection declaration – You can define connection bundles (Full, Filtered, Convolutional, Pooling, Response normalization) – Full connection bundle is the default configuration.
  4. Share declaration (Optional) – Defining multiple bundles with shared weights.

This is a simple neural network defined by a Net# script to perform a binary classification. You can customize the number of hidden neurons and the activation functions and see how the accuracy of the model variate.

<!– HTML generated using hilite.me –>

//A simple neural network definition
//auto keyword allows the ANN to automatically include all feature columns in the input examples
//input layer named Data
input Data auto;

//Hidden layer named "H" including 200 nodes
hidden H [200] from Data all;

//output layer named "Out" including 2 nodes (binary classification problem) 
//Sigmoid activation function has been used.
output Out [2] sigmoid from H all;

For more insides here’s the resources – https://docs.microsoft.com/en-us/azure/machine-learning/studio/azure-ml-netsharp-reference-guide#overview

Evaluating AzureML Experiments

Azure Machine Learning Studio allows you to build and deploy predictive machine learning experiments easily with few drags and drops (technically 😉).

The performance of the machine learning models can be evaluated based on number of matrices that are commonly used in machine learning and statistics available through the studio. Evaluation of the supervised machine learning problems such as regression, binary classification and multi-class classification can be done in two ways.

  1. Train-test split evaluation
  2. Cross validation

Train-test evaluation –

In AzureML Studio you can perform train-test evaluation with a simple experiment setup. The ‘Score Model’ module make the predictions for a portion of the original dataset. Normally the dataset is divided into two parts and the majority is used for training while the rest used for testing the trained model.

train-test

Train-test split

You can use ‘Split Data’ module to split the data. Choose whether you want a randomized split or not. In most of the cases, randomized split works better. If the dataset is having a periodic distribution for an example a time series data, NEVER use randomized split. Use the regular split.

Stratified split allows you to split the dataset according to the values in the key column. This would make the testing set more unbiased.

  • Pros-
    • Easy to implement and interpret
    • Less time consuming in execution
  • Cons-
    • If the dataset is small, keeping a portion for testing would be decrease the accuracy of the predictive model.
    • If the split is not random, the output of the evaluation matrices are inaccurate.
    • Can cause over-fitted predictive models.

Cross Validation –

Overcome the mentioned pitfalls in train-test split evaluation, cross validation comes handy in evaluating machine learning methods. In cross validation, despite of using a portion of the dataset for generating evaluation matrices, the whole dataset is used to calculate the accuracy of the model.

K-fold_cross_validation_EN

k-fold cross validation

We split our data into k subsets, and train on k-1 of those subsets. What we do is holding the last subset for test. We’re able to do it for each of the subsets. This is called k-folds cross validation.

  • Pros –
    • More realistic evaluation matrices can be generated.
    • Reduce the risk of over-fitting models.
  • Cons –
    • May take more time in evaluation because more calculations to be done.

Cross-validation with a parameter sweep –

I would say using ‘Tune model Hyperparameters’ module is the easiest way to identify the best predictive model and then use ‘Cross validate Model’ to check its reliability.

Here in my sample experiment I’ve used the breast cancer dataset available in AzureML Studio that normally use for binary classification.

experimentThe dataset consists 683 rows. I used train-test split evaluation as well as cross validation to generate the evaluation matrices. Note that whole dataset has been used to train the model in cross validation case, while train-test split only use 70% of the dataset for training the predictive model.

Two-class neural networks has used as the binary classification algorithm. The parameters are swapped to get the optimal predictive model.

When observing the outputs, the cross-validation evaluation provides that model trained with whole dataset give a mean accuracy of 0.9736 while the train-test evaluation provides an accuracy of 0.985! So, is that mean training with less data has increased the accuracy? Hell no! The evaluation done with cross-validation provides more realistic matrices for the trained model by testing the model with maximum number of data points.

Take-away – Always try to use cross-validation for evaluating predictive models rather than going for a simple train-test split.

You can access the experiment in the Cortana Intelligence Gallery through this link –

https://gallery.cortanaintelligence.com/Experiment/Breast-Cancer-data-Cross-Validation

Chatbots : What & Why?

robot-customer-serviceThe word ‘chatbots’ has become one of the most whispered words in the tech world today. Each and every tech company is putting a lot of effort on researching and developing bot related technologies.

The very first thing that you should keep in your mind is “Bot is not an acronym neither a magic app”. Bot is an application that operates as an agent for a user or another program or simulates a human activity.

I would say, there’s no Artificial intelligence or natural language processing attached with most of the chatbots you see out there. But AI and machine learning have become prominent factors of giving bots more human side.

The evolution of chatting paradigms and the rapid adaptation of millennials for chatting platforms like Facebook messenger, WhatsApp and Viber increased the need of chatbots that can handle business processes.

df

Evolution of user interaction

The same way a website is interacting with a user, bot acts as the interface into the service. Simplicity, increasing productivity, personalized service lines are some of the major benefits that we can achieve with getting chatbots into the play.

Super bots Vs domain specific bots

Probably the very first thought that comes to your mind when it says ‘bots’ might be “Siri, Cortana or Google assistant”. Dominating our pockets with their ability of interacting as a personal assistant, these software utilities can be defined as super bots. They are equipped with speech recognition as well as natural language understanding. Normally there’s a persona specifically designed for these super bots. The backend of these intelligent applications is backed with machine learning and deep learning based technological interventions.

we-put-siri-alexa-google-assistant-and-cortana-through-a-marathon-of-tests-to-see-whos-winning-the-virtual-assistant-race--heres-what-we-found

AI powered personal assistants in your pocket and home

Domain specific bots are easy to find and easy to build (comparatively to the super bots). They are specifically designed aligning to a particular business process.  Ordering a pizza from nearest pizza shop, customer service call centers or booking a flight ticket are some example business processes that can be easily adopted to a conversational bot interface. These bots may use machine learning techniques for natural language understanding.

Business bots Vs Consumer bots

Bots are not only mend to be to involve in business process. Fun is mandatory! The consumer bots are specifically designed to maintain human like conversations with the users. Sometimes even for flirting 😉 Mitsuku is known as one of the prominent consumer bots that have built for today.

Text or the voice?

Interacting with a chatbot can be done in several ways. Textual communication is just one thing. Speech recognition enables the user to interact with the chatbots with speech. Some chatbots provide interactive clickable cards for user interaction. Amazon Alexa even has a hardware component that interacts with the user with voice commands.

Building bots

There are plenty of programming paradigms prevailing today that helps you to build conversational bots. Microsoft Bot Framework is a programmer friendly framework that supports C# or node.js for deploying bots. Integrating chat channels like Skype and messenger can be too done through the framework.

Natural Language understanding provides more human like nature for bot’s conversations. For that, LUIS service by Microsoft, API.AI, wit.ai are some prominent services used today by the programmers. No need to go from the scratch of machine learning algorithms. Just an API call will do the magic for you.

Bots can be given more human like abilities with machine learning based intelligent API services and SDKs. Microsoft Cognitive services is a valuable toolset that you can use to give your chatbot the ability to see, hear and even think!

What’s next?

I guess, codeless bot building services (some are already there in the market, but not so matured) and natural language generation would be the next big things in the conversational bot building industry. Deep learning will come to scene with language generation for sure.

Time to market is a prominent factor in the world of business. Then why not going with the trend and adopt a chatbot for your own business or start building bots as your business? 😉

Copying & Migrating AzureML experiments

A set Major advantages in using cloud based machine learning platforms are the ability of collaborative projects, easy sharing and easy migration.  Within AzureML Studio you can share or migrate the experiments using various approaches.

01. Share AzureML workspace

If you want to share all the experiments in your workspace with another user, this is the best option you can go with. All your built experiments, trained models, datasets would be shared with the users with this permission.

  1. Click SETTINGS in the left pane
  2. Click the USERS tab
  3. Click INVITE MORE USERS at the bottom of the page

ml4
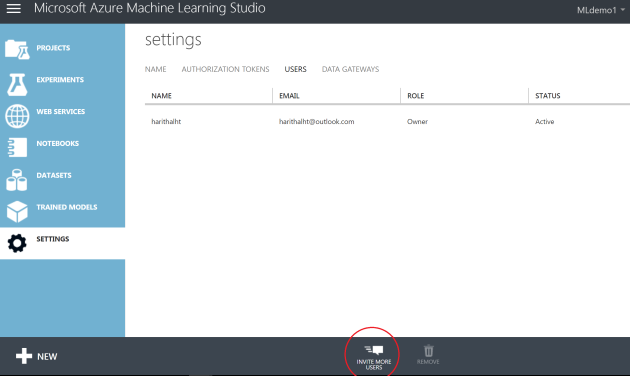
The users you inviting should have a Microsoft account or a work/school account from Azure Active Directory. Two user access levels can be defined as “Users” and “Owners”.

02. Copy experiment to an AzureML workspace

If you want to migrate an experiment from the current workspace to another, you can go for the experiments pane and click “Copy to workspace”. Note that you only can copy experiments to the workspaces in the same Azure region. This is important if you want to move your experiment from a free tier workspace to a paid standard tier.

ml6
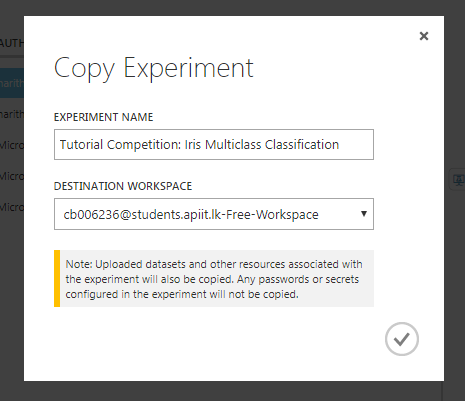
You’ll not be able to copy multiple experiments using a single click. If you have such kind of scenario, use poweshell scripts as instructed in this descriptive post.

03. Publish to Gallery

ml7For me this is one of the most useful options. You can use this option in two ways. One is to make the experiments public and in a way that only accessible through a shared link. If you share the experiment publicly that will be listed in the Cortana Intelligence Gallery.

ml8
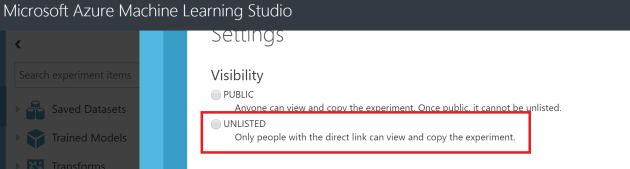
If you want to share an experiment only with your peer group, publishing as an ‘unlisted’ experiment is the best way. Users can open the experiment in their own AzureML studio. This option can be used to migrate your experiment within different workspaces as well as between different azure regions. Only the users who’s having the link you shared can only view or use the experiment you shared.